
So, your biceps won’t grow, eh?
Despite training hard and being consistent, you can’t see the growth you hope for.
Like most people, you’re probably wondering where the problem is and what you can do about it.
In this guide, we’ll go over everything you need to know about your biceps, why they won’t grow, and how to spark progress with seven actionable tactics.
Let’s dive in.
More...
What is The Biceps Muscle Itself
The bicep muscle has two heads – short, inner and long, outer head that work together.
There is also the brachialis muscle. An assisting muscle that helps with elbow flexion.
You can only see a small part of it between your biceps and triceps because it actually lies underneath.
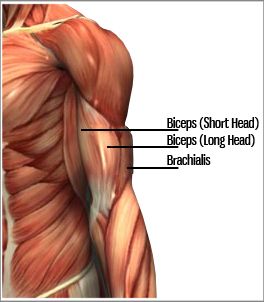
Because of its position, the bigger it grows, the more it pushes out your biceps up making it look taller.
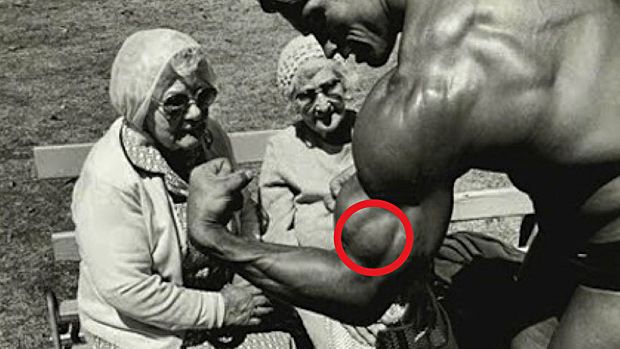
Both heads of the biceps arise from the scapula and attach to the radius bone.
How We Should Approach Training the Bicep
Since the bicep has two heads, you can emphasize one over the other with the exercises you choose and the grip width you use.
The Long Head
You can better target the long head of your biceps by using a narrow grip on your barbell curls. And here are 2 extra exercises that emphasize the long head:
You will have to lower the weight down a bit from your regular dumbbell curls.
Still, don’t underestimate this exercise. It will hit the long head of your biceps and help develop the peak.
How to: Dumbbell Hammer Curl
An especially good exercise to hit the long head of your biceps, brachialis, and forearms at the same time.
I prefer to do them seated as it allows me to control the weight better without using momentum.
The Short Head
For the short head of the biceps, you can incorporate wide grip barbell curls. Here are two more exercises that emphasize the short head more:
One of the best ways to isolate your bicep muscle. Make sure you are doing this exercise with full range of motion. Let your biceps stretch at the bottom position, followed by a contraction on top.
You can also incorporate this exercise to hit the long(outer) head of your biceps by switching to a more narrow grip.
How to: Spider Curls
Again, the focus here is to perform the exercise with full range of motion.
The Brachialis
As I mentioned above, the brachialis is a muscle that lies underneath the biceps and assists in elbow flexion. Because of that, the brachialis gets worked during most of the curling exercises you do.
To put more emphasis on it, you can include the dumbbell hammer curl we saw above.
One Often Ignored Aspect of Proper Bicep Training
Training your biceps seems simple, right? You grab a weight and you curl it through the range of motion.
Something like this:
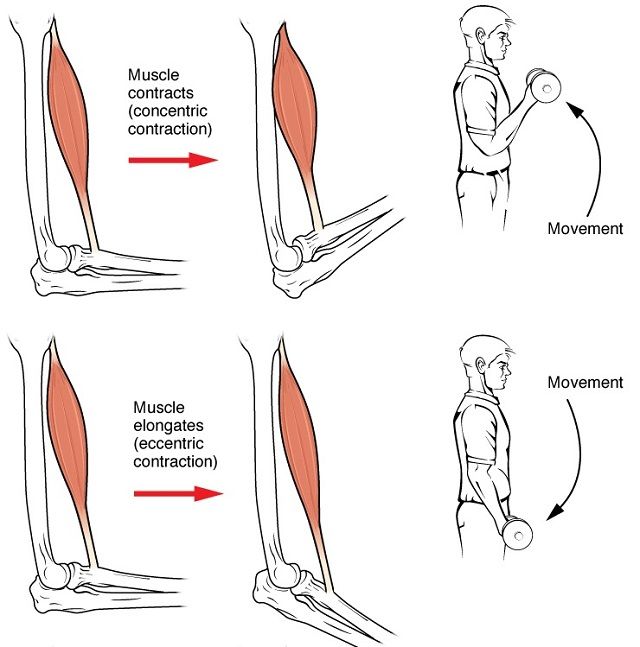
Although training your biceps and stimulating them to grow does come down to this essential movement, it goes a bit further than that.
You see, on its own, this movement is going to cause some damage and growth in your biceps. But, you also need one other addition to make your workouts worthwhile.
And that is wrist supination at the top of the movement. For those of you unfamiliar with the term, wrist supination means to rotate it up towards the ceiling:
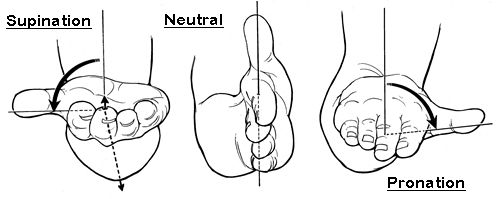
The biceps’ main functions are to flex the forearm at the elbow and to supinate your wrists. The only way to reach a peak contraction at the top of a curl is to have your wrists facing the ceiling or supinating.
This simple movement ensures that each repetition you do makes your biceps work as much as possible. In turn, this leads to better strength and muscle gains.
Here is a simple 2-step exercise you can do to confirm that this is true:
1.Keep your arm to your side and with your wrist in neutral position, bend at the elbow to form a 90-degree angle.
2.Now, without trying to contract your bicep, supinate your wrist to face the ceiling. You will see how your bicep muscle peaks a bit without you even trying to flex it.
You can also do it with a light dumbbell if it helps you feel your bicep more.
Here is what I want you to take away from all this:
Yes, bicep training is mostly doing curls. But the way you do them makes all the difference.
Supinate your wrists at the top of the movement to achieve a peak contraction.
If you should ever have trouble with wrist pain when you’re curling, I recommend this video.
With that said, let’s get into the seven ways to force better results if your biceps won't grow:
Before we get going, I'd just like to quickly share something with you.
Greg Nuckols, Eric Helms and Dr. Mike Zourdos are doing an excellent job at reviewing the current literature in the strength and physique sports in their monthly research review: MASS.
If you are interested in maximizing bicep growth (and whole-body for that matter), there are quite a few pieces that are worth checking out:
You can check my full review of MASS here.
Biceps Won't Grow? Here Are 7 Actionable Tactics.
1. Develop Good Mind-Muscle Connection
Before you can even think of developing big biceps, you need to establish a good mind-muscle connection.
A lot of people have a poor connection to their biceps and are frustrated with their lack of growth.
Although bicep training may seem easy, it actually requires a lot of mental focus to get the most out of each rep.
If you find yourself curling and not feeling the biceps working, this could be the case for you.
It can be the case for the non-dominant arm or both. The bottom line is, you need to work on your mind muscle connection.
But how does one do that?
Well, there is no quick fix here. You need mindful practice. Take light weights and practice great form on each bicep movement. Be in control of the weight 100% of the time. Don’t swing it from point A to point B.
One great isolation exercise to get you going is the dumbbell preacher curl. Because it removes your shoulders from the curl, you can establish a good mind-muscle connection with your bicep.
Taking advantage of the eccentric contraction is another great way to develop a good mind-muscle connection.
Use an exercise like the barbell cheat curl to do that. The idea is: add a bit more weight on a bar than you normally curl.
Use a bit of momentum and muscle-up the barbell to the top of the curl. Don’t overextend your low back.
On the way down, try to control the weight as much as you can with your biceps.
Here’s a video demonstration.
If you are a complete beginner and you can’t feel your biceps when doing curls, you should practice contracting them often.
Flex and extend your elbows in different planes of motion and put as much mental effort as you can into contracting your biceps and feeling them.
Most guys won’t have trouble establishing the mind-muscle connection. And some will only have trouble activating the bicep of their non-dominant hand.
But one thing is for sure: you need to practice.
2. Progressively Overload Your Biceps on Each Movement
The principle of progressive overload is the main thing separating training from exercising.
Exercising means to move your body, sustain your physical fitness and health. There is no element of progression there.
Training is different. There is an emphasis on progress and improving your performance over time.
No matter what improvements you're aiming to achieve, you need to adhere to the principle of progressive overload if you want gains.
The principle states:
In order for a muscle to grow, strength to be gained, performance to increase, or for any similar improvement to occur, the human body must be forced to adapt to a tension that is above and beyond what it has previously experienced.
If your biceps won't grow, you are likely not overloading them.
There are many ways to achieve progressive overload in your training. Here are some of them:
- Lift more weight.
- Do more repetitions with the same weight.
- Do more sets in less time (smaller rest periods).
- Do the exercise with a better range of motion.
- Do more sets with the same weight.
- Lift the same load and volume more often throughout the week.
- Lift the same weight with less effort and better form.
As you can see, adding pounds on the bar is not the only way to overload your muscles. With curling exercises, it’s that much more important to take advantage of other ways to overload your bicep.
More weight can lead to bad form.
Focus on small improvements on a weekly basis and never allow yourself to get comfortable with your training.
3. Give Your Biceps Enough Work
Training volume is one of the key drivers for muscle growth. The amount of work you give your biceps needs to be enough for them to grow.
No exercise technique and hack can help you overlook that fundamental law.
The problem is, it’s hard to pinpoint exactly how much work we should do to optimize our results. It is more or less done through trial and error.
There are certain guidelines you can follow to get a rough idea where to start, though:
For smaller muscles (such as the bicep), the general recommendations are to do between 6 and 9 working sets per week.
If you are more on the newbie side, I’d start with 6 per week and see where it takes me. If you’re more in the intermediate zone and are having difficulty growing your arms, I’d suggest going 9+ sets per week.
You can also increase the frequency of bicep training to add extra work here and there.
For example:
If you have a dedicated day for arms, do a few sets for the bicep at the end of your pull (or back) workout.
If you train bicep after back, add a few sets for bicep at the end of a different workout such as legs, chest or shoulders.
Adding more work for your biceps here and there can help them grow as opposed to hitting them once per week.
It’s also important to note that excessive lifting to failure may seem cool, but it actually is counterproductive in most cases.
You see, since training volume is such a crucial part of muscle growth, you need to think:
“How can I get the most out of this entire workout?”
Rather than..
“How can I squeeze the most out of this one set I’m doing now?”
When you take a set to failure, you compromise your ability to perform on the same level after that.
And what might seem like a great idea to curl ‘till you can’t feel your biceps anymore, actually hinders you.
Think of it this way:
Let’s say that there are two people curling beside each other.
Person A is the typical gym bro who takes each set to failure like his life depends on it.
But, Person B is much more strategic with his fatigue and stops short of failure on each set.
Both guys take a pair of dumbbells and do 4 total sets of curls.
Person A exhausts his biceps completely on set 1 after he gets 13 total reps (when he should’ve stopped at 10 or 11). Then set 2 is 8 reps. Sets 3 is 5-6 reps. And set 4 is no more than 3 reps.
His total repetitions done are 29-30.
Person B does 10 repetitions on the first 3 sets and each time stops short of failure. But the fatigue from the first 3 sets catches up to him and on the 4th he hits failure on the 10th rep.
Person B does a total of 40 repetitions compared to the 29 Person A gets.
Now, looking at this scenario from a work volume point, you can see that person B, doing more work, will get better results.
Lifting to failure is a tool you should use but not all the time. Take only a handful of sets in the entire workout to failure, the last ones for each muscle you train.
That way, you can push yourself to the limits on occasion and still reap the benefits of smart training.
4. If Your Biceps Won't Grow, Stop Using Momentum
An advice I find myself giving more and more is: be in control of the weight!
This is a concept that a lot of lifters can’t understand. And it’s a shame.
When training your biceps, it’s easy to cheat and make your training ineffective.
Imagine doing straight bar bicep curls, swinging your body back and forth and involving your shoulders. Do you think your biceps are going to be targeted enough to force growth?
No, I didn’t think so either.
The good news is, you can start seeing positive results from your training by making a few slight adjustments:
Choose a weight that allows you at least 6-8 reps with great form.
Keep your core engaged, glutes contracted, wrists straight and elbows locked by your sides.
As you bring the barbell down to the bottom position, make sure you are extending your arms to stretch the biceps. You can flex your triceps to ensure that your arms are straight.
The only moving joint during a bicep curl is your elbow, period. If you find yourself swinging the bar up and down, lower the weight.
And now, here is a video demonstration of a proper barbell bicep curl.
These kinds of adjustments might force you to lower down the weight but don’t get discouraged.
Fix your form and you’ll allow your biceps to shine!
5. Add Variety Into Your Bicep Routine
Over the years, I’ve learned to incorporate a few things into my workouts to ensure that my progress doesn’t stop. One of them is variety.
If your workouts always consist of the same exercises, sets, reps and rest periods, you are setting yourself up to hit a plateau.
Now, don’t get me wrong.
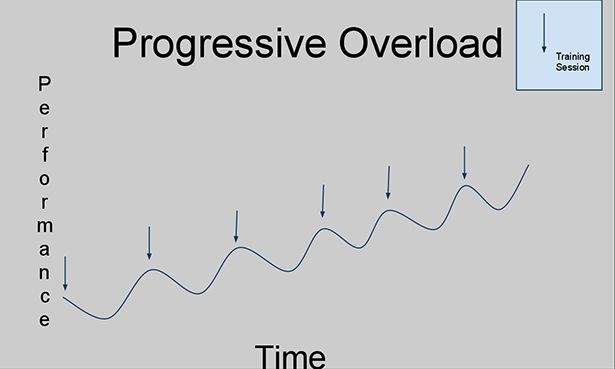
Even with a training program designed for you, added variety, good nutrition and enough rest, your progress won’t be linear.
(Unless you are still in the beginning stages of lifting i.e. first 1-6 months.)
You won’t get bigger and stronger week by week and that is something you need to come to terms with.
This basic chart shows you what progressive overload looks like:
How do I add variety to my bicep training?
Your biceps are simple muscles. They don’t need much complexity to grow. Yet things like intensity techniques and exercise variety should not be overlooked if you want to keep your gains coming over time.
Here are a few ways to add variety to your training and most of them can be applied to all muscle groups:
Do bicep exercises with EZ/straight bars, dumbbells, machines (if your gym has one) cables and bands.
If you are pressed for time, incorporate different intensity techniques such as drop sets, negatives, partial reps, forced reps, and 21’s. Quick and convenient ways to add more training volume within less time.
Change the grip width on bar-based curls. A wider grip puts more emphasis on the short, inner head of the biceps.
A narrower grip works the long, outer head more (the long head is also responsible for the peak of your bicep).
Take advantage of different repetition ranges. Do cheat curls with a slow, controlled negative but also high rep burnout sets.
Doing things like:
Are going to ensure that you target both heads more effectively and build more muscle over time.
6. Use Full Range of Motion
By now, you should know that bicep training needs variety and good form to produce good results.
Not using the full range of motion for your bicep exercises is one of the biggest mistakes you could be making.
Think of it like this:
If you’re doing a bicep curl and are only going halfway down, you are limiting the benefit of each rep. You're also not utilizing the full power of the negative (eccentric) part of the lift.
If you only do 50-75% of the full range of motion, expect to have 50-75% of the results, it’s only fair.
But you aren’t going to the gym to waste your time and only get half the benefits of training. That’s why you’re looking for ways to improve your training and see where you might be doing wrong.
Here are 4 steps to take to ensure that you are performing each bicep exercise with full range of motion:
Step #1: Put your ego aside and lower the weight if necessary.
Most of the time, half-reps are caused by using a weight that you can’t control. Choose a load that allows you at least 6-8 strict reps with full range of motion and good control.
Step #2: Make sure you are going all the way up and your biceps are contracting.
I often see people stop short of top position and don’t fully contract their biceps. As you bring the weight to the top position, make sure to squeeze the contraction for 1-2 seconds.
Step #3: Extend your elbows.
To ensure that your biceps get a nice stretch and hit the full range of motion, always make sure you are extending your arms. You can do this by flexing your triceps which forces your arms to extend.
Step #4: Put your biceps in a stretched position with the help of your shoulders position.
We’ve learned that the bicep attaches to the scapula. And because of that, we need to extend our arms back behind the body to use the full stretch at the bottom.
Just like the supinated wrist is crucial for a full contraction at the top, so it this – for the stretch of the muscle.
Here is a video by Alberto Nunez showing you a practical exercise and technique you can use to incorporate the full bicep stretch.
Now, I’m not saying that partial reps don’t have their time and place. Such as when you hit muscle failure. You can continue to do the curl for as much more reps as you can with half or even 3/4 of your normal range of motion.
You can read this article on partial reps vs. full reps by Bret Contreras for more information on the topic.
7. Have a Separate Arm Day
This is what trips a lot of people up.
The majority of gym-goers follow a classic upper/lower or push/pull/legs split and it is by no means a bad way to train. But, with this split, your biceps always come as a secondary muscle and never get their time to shine.
After a tiring back session, your biceps will most likely have 3-6 sets of curls before you call it a workout.
You may think that doing some bicep work after a tiring back session is enough.
While that’s a good start, this isn’t going to produce the best results for your biceps.
If you go the extra mile by including a separate day for your arms, you will be able to see much better progress and here’s why:
You can use bigger weights because your biceps will be well rested and not pre-exhausted from an entire back workout.
You can do more exercises that will target each head better and produce more growth and strength gains in the long run. More volume = more gains.
Here is a personal example:
I used to train chest with triceps and back with biceps for a long time. And, while I did see some impressive progress with my chest and back, my arms were always coming in second.
I could barely see any progress with them even after months and months of training and eating in a surplus.
Maybe a quarter inch in 6 whole months. That sucked. And my arms weren’t big, to begin with.
Once I decided to give my arms their own day, I started noticing that my strength improved and my arms grew.
I gained more size in my arms in the 3 months since I added an arm day than the full 9 months of bulking before that.
This likely won’t apply to all you guys. Some of you may have an easier time gaining arm size. For you, low volume approach could work well.
For me, and for a lot of other guys, higher volume approach is needed to build big arms.
One Tip to Keep in Mind if You Decide to Give Your Arms Their Training Day
You need to add your arm day so it doesn’t interfere with your chest and back routines. Always make sure to have at least 48 hours between your back-arms-chest sessions.
Here is an example 5-day training split from t-nation.com that has its own arm day:
| Day 1 (e.g., Monday) | Chest & Calves |
| Day 2 (e.g., Tuesday) | Back & Abs |
| Day 3 (e.g., Thursday) | Shoulders & Hams |
| Day 4 (e.g., Friday) | Quads & Abs |
| Day 5 (e.g., Saturday) | Arms |
And here is an example 4-day training split with its own arm day:
| Day 1 (e.g., Monday) | Chest & Back |
| Day 2 (e.g., Tuesday) | Legs |
| Day 3 (e.g., Thursday) | Shoulders & Traps |
| Day 4 (e.g., Friday) | Biceps, Triceps & Forearms |
As you can see, the chest-back sessions are properly spaced out from the arm day within these 2 example splits.
Conclusion
Don't despair if your biceps won't grow. Like with most things, the issue is probably hinding somewhere within the process itself.
Take a good look at how you're training and start using the seven tactics from above.
So long as you're eating well and resting enough, your biceps should start growing in no time.
Leave a Reply